For a number of years now, I have been studying/messing with boat design to better understand construction elements and techniques. I probably have a dozen books on the shelf on different kayak, canoe, and small boat designs but never had an all-season place to work on a longer-duration projects. I ended up starting a number of one-meter yacht models to satisfy my curiosity…at least for the time being.
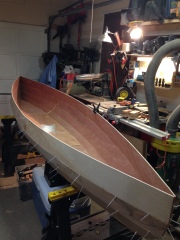
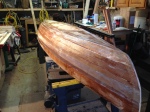
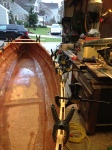
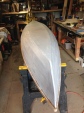
The project at hand, stitched together and awaiting forming and gluing
A couple of summers back, I picked up a book by Gavin Atkin- Ultrasimple Boat Building. It described a number of boats built with plywood using a stitch and glue method, that is tying together the multiple panels of the boat with wire or zip ties and then using high strength adhesive to permanently bond the seams. I was intrigued by the simplicity and the fact that I could possibly use a low cost material, 1/4″ plywood often referred to as lauan.
There are many articles on the merits or drawbacks of using non-marine grade plywood for small craft construction. The sides are strongly divided on whether it is a good idea or not. Since I wasn’t planning on rowing my boat across the ocean and was willing to spend a couple hundred bucks to learn the truth, I decide to forge ahead. Most stated drawbacks with lauan started with structurally unsound pieces with voids or weaknesses. I endeavored to buy the best $10 lauan I could find and moved forward. Two sheets would be required, so my project materials cost was up to $20.
Atkin’s book described a 12 foot a multi-strake or soft-chine canoe that seemed like a perfect candidate for my project. Big enough for one or possibly two adults but small enough to be built in my shop and simple enough to allow me to learn as I go, with little risk (hopefully) for disaster. And if it didn’t float or last more than a year, lesson learned.
The book provided the numerical coordinates for each strake but the five pages dedicated to this boat were generally short on detailed explanation. However the combined information from the remaining books on the shelf gave me plenty of confidence to begin.
Kicking Off the Project
The two sheets of plywood were laid out on three sawhorses and I (with my buddy Scott) began to map the coordinates (a bunch of dots) using a drywall square and tape measure. From the 20 or so coordinates for each strake, I was able to connect the dots using a scrap piece of plywood I could curve to form the lines. We then roughly cut out each strake to make the pieces more manageable and headed to the band saw to trim each piece to its final shape.
It was a lot of cutting that followed some very questionable lines formed by some rough coordinates and a piece of bent plywood. I was skeptical that it would ever go together and my buddy Scott was even less impressed and mumble something about leaving a boiling pot on the stove and excused himself from the project. Nonetheless I perservered and assembled the bottom of the hull and the first set of strakes. The bottom of the hull was formed by three individual panels and broke apart when I tried to move the assembly to storage shed for the weekend, I realized that I was not set up to complete this project successfully. I put all of the pieces in the loft of the shed and moved on to a different project.


The project remained on the shelf for about 18 months until I set up my permanent shop in our new house. As summer came to an end, I decided that reviving the project may be a good winter activity and with any luck I could be canoeing on the bay in the spring . I collected all of the pieces from shed and brought them to the shop to begin again. All of the pieces had survived and with a little patch work to fix the broken pieces, the project was back on track.

Forming the Hull
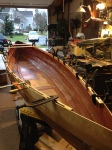
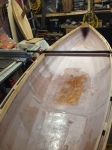
The process for building the canoe consists of attaching mirrored pairs of the strakes to the canoe in sequence (bottom to top) using small zip ties to hold the pieces in place. Small holes are drilled in adjacent strakes to pull the strakes together and hold them firm (firm but definitely flimsy).

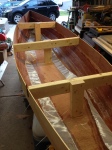
First row of strakes attached to the bottom of hull


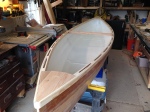
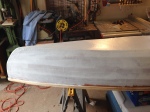
The entire structure is mounted to a strong back to ensure the hull is straight and properly flat

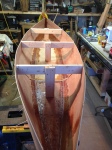
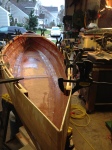
T-braces are added to give the hull its final shape and to hold that form until epoxy resin and tape are applied and hardened
Now that the strakes have been tied together, the canoe has begun to take shape. The next step is to add three T-braces to the internal structure that will ensure its final shape during the process of gluing the seams at each chine with epoxy resin and fiberglass tape. Once resin has hardened and the structure is more rigid, the braces are removed.
Coming up….I quadruple my project costs with the purchase of epoxy resin and tape, the canoe gets multiple coats of resin and fiberglass, and the thought that “this thing just might work” begins to enter my mind…..
Resin and Tape – Committing to Complete the Project
Up to this point in the project, I have invested less than 50 hours in the project and maybe $30 in materials. My initial work has led me to believe that this project is viable and that there appears to be a fairly high probability of some level of project success. Frankly the shape of the canoe looks pretty good, actually like a canoe. And even with the strakes only connected by zip ties, the canoe has a certain amount of rigidity that leads me to believe that with some fiberglass work, I will have a lightweight but solid canoe, maybe not enough to venture out into a class 5 rapids but certainly good enough for some paddling around on the Chesapeake Bay.
With that scientifically airtight analysis of my project health in hand, I decided to ventured forth and continue building the canoe and not relegate it to the fire pit (see my entry on the Newgrange Fire Pit) as kindling.
Next step, add the inwhales and gunwhales, the breasthooks, and centerhull support, followed by thickened epoxy resin filleting and resin and glass reinforcing at the chines, bow and stern.


The particular order of the steps is not exact but generally speaking all activities during this process are focused on giving the canoe its final form and then bonding the strakes together and strengthening the hull. In the gallery above (click to view gallery), the images show work beginning on the inside of the hull. Any seams that were not tied with zip ties were first reinforced with epoxy resin and 4″ 6oz. fiberglass tape. I haven’t done a lot of work with epoxy resin and tape so this was certainly a learning process planning and mixing to application. I first painted all of the seams with the epoxy resin and then applied the strips of fiberglass tape as neatly as I could, know that any roughness and flaws would need to be sanded out later. I have read that sanding epoxy resin is a pain after it hardens. What have read is 100% true, even with an aggressive belt sander.
I also filled all areas that were not tape with a thin lager of thicken epoxy resin, feathering the fillets to make the application as smooth as possible. Once the first application was dry I performed my first round of sanding the inside seams, just to see what I was up against before heading to the outside of the hull. What I learned is that the harden resin and filled resin, is a pain to sand. Did I already mention that? Its mostly a pain because not only is it hard but it also fills the sandpaper quickly rending the sandpaper useless. Nonetheless, I was pretty much satisfied with the first pass on the inside and moved to the outside.
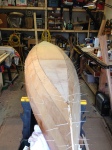
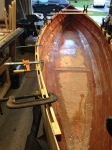
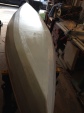
With the hull quickly gaining rigidity, I flipped the hull over on my sawhorses, cut the zip ties from the outside and began sanding the outer hull with my belt sander. I had 50 grit paper on the sander with the goal of removing all rough edges at the chines and making the outer hull as fair as possible without removing too much of the outer layers of the lauan and causing other issues down the road. Once the hull smooth and fair, I repeated the process used on the inside of painting epoxy on the hull and then laying out strips and smoothing/stretching with resin spreader squeegees that are key to keeping the cloth flat and evenly applying the resin. I avoided putting any cloth at the shear clamp as my next step would be to apply in the inwhale and gunwhales and I wanted to maintain a smooth surface. The outside was definitely easier to work on than the inside of the canoe and my technique for applying the fiberglass tape was definitely improving.
Time to turn the back over onto its bottom and start applying the inwhales and gunwhales.
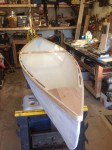
As shown in the above gallery, the inwhales and gunwhales are epoxied to the hull to provide the real rigidity needed for the canoe to hold its form. The inwhales are spaced from the hull with 2″ blocks every 10″ creating a lightweight but rigid structural form. The inwhales are cut short at the bow and stern to allow placement of the breasthooks that are expoxied into the hull and provide additional strength and form. The gunwhales are attached to the outside in a similar manner but this time directly to the hull. Each were attached progressively from the bow to the stern, working from one side to the next to ensure that undue torque was not applied to the canoe hull to bend it out of form on one side or the other. Considerable force was required to bend the 1/2″ x 1 1/2″ pieces of wood and many clamps were applied to ensure that a firm bond was formed and that the gunwhales and inwhales followed the shape of the hull. An additional day of cure time was allowed to make sure that all joints and seams were solid before the next steps in the process were initiated.


As shown in the images above, the construction is mostly complete. Breasthooks are in place and faired. The thwart is epoxied in place. The gunwhales have been trimmed and initially sanded to shape. in the With the construct part nearly complete, it was time to begin the serious sanding and finishing process. Inside the canoe, an aggressive sanding process is followed by additional filling with thickened epoxy resin. The exterior is also given a couple of laps with the belt sander, enough to remove any rough edges on the seams and any high spots but not so much to cut into the fiberglass tape. Another thin coat of epoxy resin is applied with the spreader and everything is left to cure.
During the curing process, I begin considering the height and placement of my seat, and the design of the deck on the bottom of the canoe. It will be some pattern of 1/2 x 1/12″ strip similar to the gunwhales, providing addition strength, esthetic appeal and a way to keep things placed on the canoe bottom dry. But since I want to epoxy and stain these pieces, I am going to paint the interior before I install them.
The above gallery shows the first coat of a resin-based paint, something like Kilz. I chose something that would build quickly and hopefully help to smooth any surface imperfections. I will leave the wood trim for staining but plan to paint the inside and outside with a pigmented paint that I haven’t determined yet.
At this point the canoe has achieved its final structural shape. It needs a lot of sanding and finishing work to get to the end. I need to do this work outside of my shop but the weather in January is too unpredictable to plan so I have put the project into storage until late February or March when I can work outside and complete the required steps. I don’t think I have 60 hours into the project at this point and it is pretty far along and I am pretty please with my first attempt at such a project. I am not sure how long it will take to get the finish to the point where I am satisfied but I think can see the finish line and it looks like the launch ramp at my marina.
It is solid but needs a lot of work to be handsome. A lot of work.

Update: Gavin Atkin the canoe’s designer checked in on my progress and posted an update on his site http://intheboatshed.net/2014/01/16/todd-kerr-builds-cinderella/ . His post has created a lot of positive traffic at the Sawdust Files….I guess I am now on the hook to finish the boat and get it in the water so I can update him with my final report.
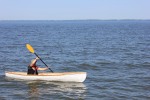
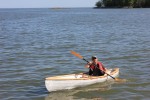
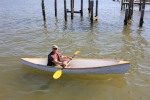
Sea Trials
Now that Spring is here, I can move forward with completion of the canoe project. As Gavin Atkin writes in his “How to” Ultrasimple Boat Building, “the builder may find it necessary to put the boat in the water before he finishes it completely”. The translation is, “I can’t wait to see if it floats…”. For me, I wanted to first “see if it floats” (I knew it would) but also want to determine the position of the seat, both fore and aft but also height from the bottom of the hull. Should it be set just below the gunnels or closer to the hull?
The canoe is already fully coated with epoxy resin and a coat of primer, and has endured a few rainstorms and a little snow while sitting outside, so I wasn’t concerned about getting her wet before the final sanding, painting, and finishing. I drove to the Chesapeake Bay, donned my kayaking vest, grabbed a paddle and launched.
The performance feedback came quickly. She is really light, very maneuverable, easy to paddle and fast. I also quickly realized that my seat positioning strategy was becoming clearer. As a one-person craft, I needed to move towards the center of the canoe to distribute my weight properly. Light and agile also meant, keeping the center of gravity close to the bottom was key. The canoe was more than willing to roll if I moved my weight towards the gunnels and more so as I raised the center of gravity.
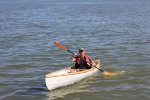

The Bay was quite calm on the day of the test which made the first excursion quite enjoyable. However, this is not always the case, and the more typical Bay chop and wake related waves may create different handling conditions and perhaps even increase the possibility of swamping the canoe. I may consider some either permanent cowling in the fore section or a removable skirt, as a modification to the existing design.
As for the seating design, I expect there will be times when I may have a second smaller passenger for quick excursions. So whatever design I employ, it will probably include the flexibility to move the seat fore and aft to balance the weight distribution. I already have planned to add some strips attached to a pair of cleats running the length of the hull that will create a deck that will keep things stored inside from getting completely wet from any water that gets into the canoe and also allow for the attachment of a moveable seat and offer tie-down points. For now the seat design will be a simple seat and adjustable back that allows me to sit comfortably, just slightly above the deck.
Sea trials are complete. I can now move forward and finish the sanding, painting, and finishing with the knowledge that we’re definitely heading down the right path with a rally fun boat. Two thumbs up!
For more info from the boats designer visit http://intheboatshed.net/2014/05/19/tod-kerr-dips-small-cinderella-open-canoe.
—————
For More information on Stitch and Glue Designs and Construction…visit Ultrasimple Boat Building, http://www.clarkcraft.com/ or Google Stitch and Glue boats.


Todd, you are a guy of many surprises! I’m very impressed with this boat. I’ve been contemplating some of Jim Michalak’s designs for a project of my own for some time. He’s also a proponent of plywood and stitch and glue. He’s got some of ugliest designs I’ve ever seen, but some nice ones too. If this ever gets out of the contemplation stage, we might have to compare notes! I like the site as well. Over and out. Greg Deahl
Thanks for visiting. I learned a lot in this first attempt and certainly identified things that I would do differently in the future. Maybe the next project will be a permanent houseboat for my slip that opens on to the bay but is never deep enough to move a powerboat or sailboat in and out.
I did prove that this project can be done cheaply and still end up with a really solid product. Being a novice at epoxy resin and fiberglass, I already improved two fold from the beginning to the end. Having a good space to work in so you can walk away when necessary is key to success and perhaps maintaining your sanity. There are a lot of good books out there including Jim Michalak’s. Simple sailboats are not far from where I started and could be a great way to find out if its something you really want to pursue.
Good building!
Tod